
Table of Contents

Disclaimer: Please note that some of the links below are affiliate links, meaning we will earn a commission if you purchase through those links (at no additional cost to you).
Introduction
When Zoe and I started GradFood, we wanted to create a
dedicated platform to post our recipes and share them with others. Being
graduate students, we didn’t have a ton of money to spend on such a site but we
still wanted to make the site look great. After a ton of research into web
hosting, site themes, WordPress plugins, etc., we found the perfect combination
of resources to create our site on a budget but still make it look great.
Knowing how much time it took us, we thought we would save you the time and
share what we have learned here FOR FREE!
1) Brainstorm
The first step to starting a food blog is brainstorming what
it will eventually look like. Remember- those who fail to plan, plan to fail! Having
a good foundation for your site is integral. Here are a few questions you might
want to answer before starting:
Why do you want to start a food blog?
We’re not going to lie, creating and maintaining a blog isn’t as easy as you think. It requires a lot of research, patience, and dedication. However, if you’re prepared for the challenge, it can be an extremely worthwhile experience and fun pastime to start a food blog (not to mention a nice way to make some money on the side!).
What will be your niche?
There are a lot of food blogs out there and you want to stand out by creating your own culinary niche. Do you want to share vegetarian recipes for two? Meal prep recipes for athletes? Cute dessert recipes? Up to you! For us, we chose our niche to focus on healthy, easy, and delicious recipes for busy people (like other graduate students!). When choosing your niche, you have to pick the right balance between being too broad that you won’t stand out from the pack and too narrow that your blog will only apply to 0.01% of the population. Although our blog was inspired by grad student life, we emphasize that it should be used by any other people who are busy (which is most people!).
How do you want it to eventually look?
If you just want to post pictures, you can get away with
just signing up for Instagram for free (or other social media platforms for
that matter). However, if you want to include recipes, appear more legitimate, and
make a profit, you’re going to want a specific site for your blog (keep reading
for instructions!). Also, how much do you want to focus on food/recipes vs
commentary? We were frustrated with food blogs where you have to scroll for 10
minutes until you actually reach the recipe, so we knew we wanted to have our
recipes in plain site, without pestering readers about what we were wearing
when we made the recipe, how much we love tomatoes (which we do!), etc. We aimed
to just keep it to the basics and create a sleek, clean-looking site.
2) Choose a web hosting platform (in our case, Bluehost)

The next step to start a food blog site is to settle on a hosting platform, a company that will host your site on the internet. We explored a number of these platforms and settled on Bluehost. We liked this one more than others for many reasons. It is popular (they host over 2 million sites), has an easy-to-use interface, and has very affordable prices compared to other hosting sites. A key feature is free unlimited access to WordPress (the site-designing interface). They also make it quite simple to sign up (keep reading to find out how set up your Bluehost account!)
3) Select a package
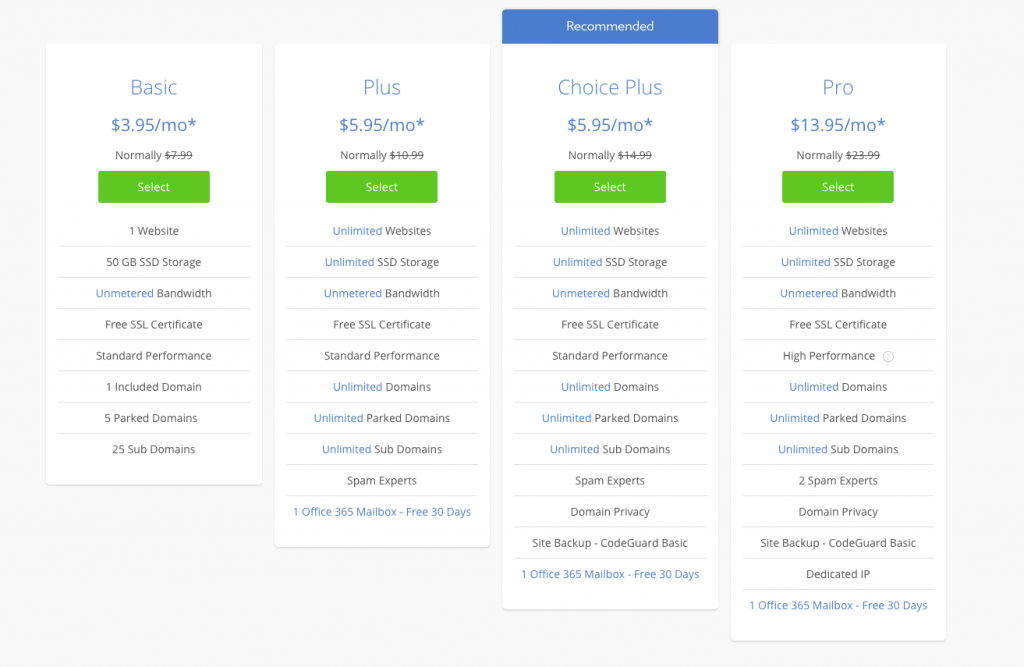
In our case, we chose the most basic package. We would recommend this for anyone just starting out. The other packages are useful if you plan to host multiple sites or eventually have tons of traffic. Pro tip: if you get a popup during Bluehost registration that advertises a lower starting package, make sure to click it. Dollars saved!!!
4) Choose a domain name
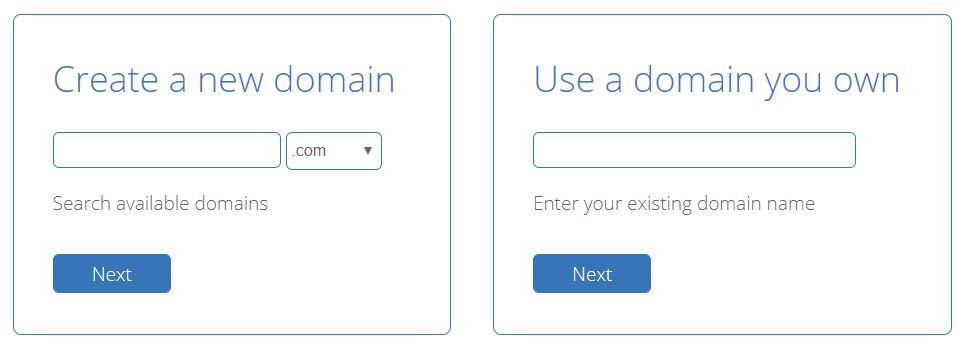
The nice thing about Bluehost is that when you start a food blog with them, they will host your domain name for free (typically about $15 extra using other hosting platforms). Below is a screenshot of what you will see when choosing a domain name (it will tell you if a domain name has already been chosen).
Some tips for choosing:
a) Try to select a concise name (for example, fredandmaryswonderfulbeetfarmindelaware.com is probably too long and specific for people to type out). Keep it short and straight to the point.
b) Make it memorable (as we mentioned above, you want to choose a unique niche that sticks in people’s minds).
c) We would recommend using “.com” rather than other URL suffixes. People know and trust that ending.
5) Select package length
In order to get the cheapest price, you need to select the longest period (i.e. 36 months). It sounds like quite a commitment but if you’ve read this far, it sounds like you’re already pretty committed to starting a blog anyways. But if you wanted to be on the safe side, you could always select a shorter initial commitment length.
6) Choose package extras
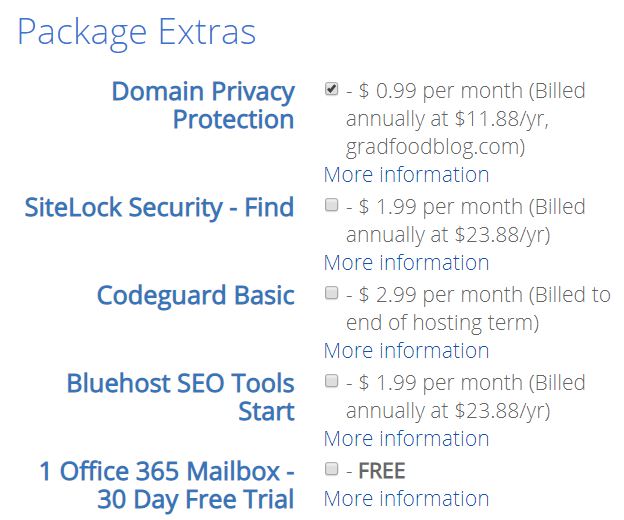
We spent time researching these options and thought that for starting out, the only one we needed was the Domain Privacy Protection one. This option protects your information (address, personal email, etc.) and prevents it from being accessed via your website. Feel free to explore the other options yourself but in our case, we only settled on this one.
7) Explore WordPress
As mentioned above, WordPress is the preeminent web design interface and Bluehost gives you free access to it (you just need to login through Bluehost, select your site, and it will automatically log you into WordPress). Here are the basic functions that will appear on the left sidebar of your Administrator screen:
Bluehost & Dashboard: these tabs contains basic links to start a food blog (most of which can just be found within the sidebar)
Posts & Pages: these tabs are used to add, remove, and edit posts and pages. The two are similar in the type of content you can display. The difference is that pages are like a permanent and constant feature of your website whereas posts are time-dependent entries within your blow and are displayed in your RSS feed. For instance, we decided to make our SHOP section a page whereas our recipe for Authentic Spanish Gazpacho (along with the rest of the recipes) are posts.
Media: here you can add media (photos, videos, etc.) to be used by your blog. However, I find it easiest to upload media within pages/posts using the media library.
Comments: allows you to respond to and moderate comments users have left on your pages and posts. Using this feature lets your readers stay engaged in your content, creating an active community within your niche.
Appearance: lets you choose a theme (see below), pick out widgets, adjust your menus, and customize the basic layout of your site.
Plugins: this important tab is where you can browse for and install plugins, which are packages of code that add functionality to your site. Some are free, some require payment. Stay tuned for a guide to the best plugins out there…
Users: lets you add and remove site users. Briefly, roles include administrator (this is you, the person who can control any and all functionality within the site), editor (can access and edit most content), author (can publish posts and upload media), contributor (can write and edit posts but can’t publish without your consent), and subscriber (only can read content and leave comments).
Tools: lets you import and export content, which can be useful for backing up your site.
Settings: lets you alter the basic site components (name, email, etc.), default formats for posts/pages, basic layout of posts and archives, comments settings, and default image sizes.
8) Pick a theme
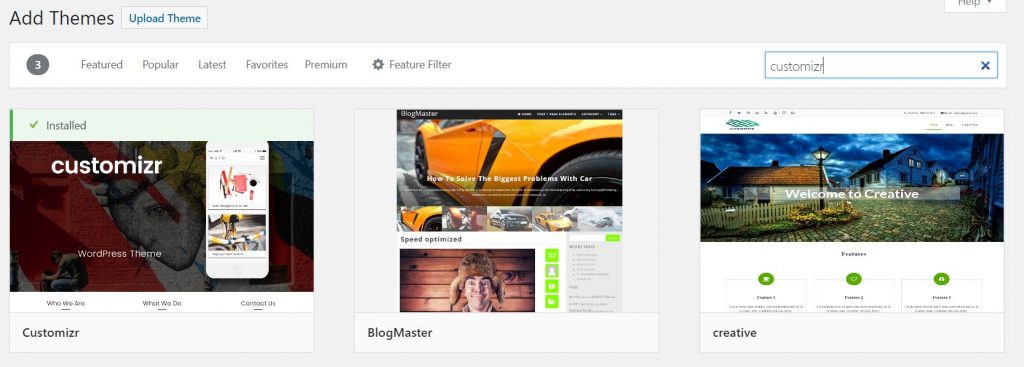
There are thousands of themes available for your blog. This will determine the general appearance, organization, and flow of the blog site. We chose the theme, “Customizr” for reasons listed below. Here are a few tips for picking a theme:
Make sure to do your research when choosing a theme.
Although you can switch themes later on, and theoretically your content will transfer over to the new theme, there will most likely be inconsistencies, making this process cumbersome, so make sure to settle on a theme you like and can trust.
Decide whether you want to pay for a theme or not.
In general, paid themes look nicer and have better updates. Some themes have a free version but require payment (either lump sum or ongoing) for the premium versions. Since we were just starting out in the field of food blogging, we decided on the Customizr theme since the free version is still powerful.
Consider how customizable you want the site.
Since we had specific ideas in mind for the site (i.e. the Food Photo Slideshow on the home page), we knew we needed a fairly customizable theme. However, if you want to keep it simple and have the theme do the work for you, consider one that already has a solid interface and appearance.
Other features you want to keep in mind when deciding on a theme
These include responsiveness (the feature that allows your site to have a consistent appearance, whether viewed on a computer, tablet, or phone), browser compatibility (try opening examples of themes in different browsers), and customer support (check the reviews to get a sense of this).
9) Start blogging!
Congratulations, you are now the proud owner of a fresh and unique website! It’s now time to start designing the site and adding content. This part is up to you but see below for more articles we have in the works to provide more assistance to you. We hope you have found this guide to start a food blog useful and we wish you the best of luck in your blogging endeavors! If you have questions or just want to reach out, you can email us at gradfoodblog@gmail.com.
10) Coming Soon…
How to Start a Food Blog is just the first of many articles we plan to write in order to share what we’ve learned in our food blogging journey. Stay tuned for the following topics:
Our recommended WordPress plugins
Trying to find free, modifiable, and powerful plugins are hard to come by. Luckily for you, we’ve already done all the work through trial and error. In this article, we will give detailed reviews, relaying which plugins worked for us and which didn’t. We also will provide tutorials of how to use and adapt each plugin for your site.
How to publicize
Although amazing content is the most important component to a blog, publicity comes in a close second. In this article, we discuss how we capitalize on social media, we review which photography submission sites are worth it and which just waste your time, and we talk about how to collect and maintain a mailing list.
How to bring your food photography to the next level
We’ve come a long way when it comes to food photography, and have picked up quite a few tips and techniques along the way. Here, we will show you how you can take incredible pictures on a budget, discussing how to make a simple food box, how to capitalize on free natural lighting, and how to utilize post-processing software to make even cell phone pictures seem professional.
How to monetize your food blog
Yes, it’s nice to use your food blog to share recipes with family and friends, but if you’re able to make some passive income from your site, it’s the cherry on top of the cake! Here we talk about what we have learned about how to monetize a food blog, going over advertisements, affiliate programs, and the plugins we use to keep these all organized.
Kitchen Tricks and Tips
Although GradFood is still relatively new, we aren’t newcomers to the world of cooking. In this article, we will go over techniques we’ve learned that will make your recipes look great and taste great, in addition to making your cooking way more efficient.